Preparing Your Embroidery Machine for a Busy Holiday Season
With the holidays approaching, it’s a bustling time for anyone involved in embroidery—whether you’re creating gifts, fulfilling bulk orders, or just getting festive. To keep up with demand and ensure quality results, your embroidery machine needs to be in top shape. This guide will walk you through essential steps for preparing your embroidery machine for a busy holiday season.
1. Deep Clean the Machine
Dust and lint can build up over time, especially when your machine has been used frequently. Begin your holiday prep by giving it a thorough cleaning.
- Remove the Needle Plate: This area is prone to collecting lint. Remove the needle plate and use a small brush or a vacuum tool to clear out dust and fabric fibers.
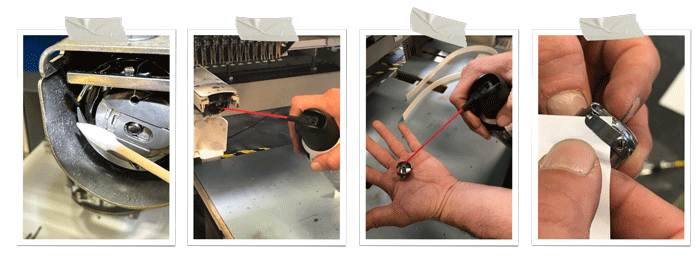
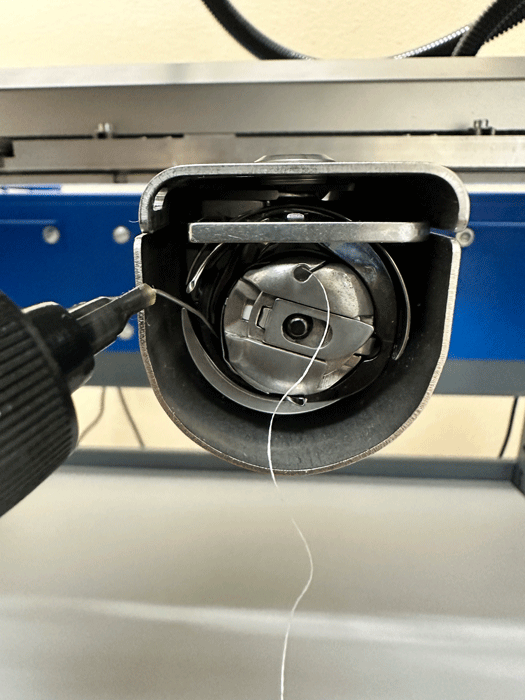
- Clean Around the Bobbin Area: The bobbin area is especially prone to collecting lint. Take out the bobbin case and clean inside using a brush or a compressed air can (used cautiously).
- Wipe Down Exterior Surfaces: Use a soft, slightly damp cloth to clean the exterior of your machine. Avoid using harsh chemicals, as they may damage the surface.

2. Change the Needle
A fresh needle is essential for a crisp, clean stitch, especially when dealing with holiday projects that often involve specialty threads and thicker fabrics. If you haven’t changed your needle recently, now’s the time.
- Needle Type: For general embroidery, a size 75/11 needle is common, but for metallic or specialty threads, consider a 90/14 needle to prevent thread breakage.
- Frequency: Many recommend changing needles every 8 hours of embroidery work or when you notice a drop in stitch quality.
3. Oil and Lubricate Moving Parts
Machines need proper lubrication to operate smoothly, especially during a busy season. Follow your manufacturer’s guidelines for oiling specific areas of the machine.
- Bobbin Area and Hook: These areas usually require a small drop of oil after several hours of stitching.
- Avoid Over-Oiling: Too much oil can attract dust and lint. Use the recommended amount, and wipe off any excess oil with a clean, lint-free cloth.

4. Check Thread Tensions and Calibrate Settings
Before diving into holiday projects, make sure your thread tensions are balanced to prevent issues like looping or puckering.
- Run a Test Stitch: Use a plain piece of fabric and run a simple test pattern to check the tension on your machine.
- Adjust Settings: Most machines will allow you to adjust upper and lower thread tensions. Make small adjustments and re-test if you notice uneven stitching.
5. Review and Organize Embroidery Accessories
Having the right tools and supplies within easy reach can make your holiday workflow smoother. Now’s the perfect time to organize your embroidery accessories and stock up on essentials.
- Thread and Stabilizers: Check your stock of popular colors, metallic threads, and holiday-themed stabilizers.
- Spare Needles and Bobbins: Keep extra needles and pre-wound bobbins close by to minimize interruptions during high-volume work.
- Embroidery Hoops: Make sure you have the right size hoops for different projects, and consider having extras on hand to save time during production.
6. Update Your Machine’s Software
Embroidery machines often receive firmware updates that can improve their performance, add features, or fix bugs. Check with your machine’s manufacturer to see if any updates are available.
- Download the Latest Updates: These may be available on the manufacturer’s website. Download and install updates before the holiday rush to avoid interruptions later.
- Back Up Designs and Settings: Before updating, back up any custom settings, designs, or files stored on the machine to a USB drive or computer.
7. Practice with Holiday-Specific Fabrics and Threads
Holiday projects often include fabrics like velvet, fleece, or faux fur, as well as specialty threads like metallic or glitter threads. Each of these materials behaves differently on an embroidery machine.
- Run Tests on Sample Swatches: Test a small piece of the holiday fabric or specialty thread to identify any tension, hooping, or stabilizer adjustments you may need.
- Adjust Speed for Specialty Threads: Metallic threads, for instance, require a slower speed to avoid breakage. Adjusting the speed before a big project can save time and prevent frustration.
8. Hooping Tips for Bulk Orders
Many holiday orders involve multiple items, like a set of custom stockings or matching family T-shirts. Using the right hooping technique will improve efficiency and quality.
- Use Multi-Hoop Frames if Available: Multi-hooping systems allow you to stitch multiple items in one go, which is a great time-saver for bulk projects.
- Mark Your Hoops: For faster re-hooping, mark the center points of your hoops with small pieces of tape or use placement stickers to quickly align each item.
9. Calibrate Your Machine for Design Positioning
The holiday season often calls for precise placement, whether it’s a monogram on a stocking or a design centered on a T-shirt. Before starting each project, calibrate your machine’s positioning.
- Use a Centering Ruler: A centering ruler or grid template can help ensure accuracy with placement.
- Practice Alignment: Test your alignment on scrap fabric, and adjust as needed to ensure your holiday designs are perfectly positioned.
10. Final Run-Through with a Sample Project
Consider doing a final test run with a sample project that’s similar to what you’ll be doing for the holidays. This helps you identify any last-minute issues and adjust your settings accordingly.
- Test with Similar Fabrics: Use a fabric similar to what you’ll be using in your projects to ensure settings like tension and needle size are just right.
- Confirm Thread Colors and Design Size: Doing this step helps you feel confident that your machine is ready for the busy days ahead.
In Conclusion With these preparations, you’ll be setting yourself up for a successful, stress-free holiday season. By taking the time to deep clean, calibrate, and organize, you’ll keep your embroidery machine running smoothly, produce high-quality results, and avoid costly delays. Embrace the holiday rush with confidence, knowing your machine is in top condition and ready for all the festive projects you have planned!
